In this lesson we will learn to use Docker containers to deploy various tools to create and serve vector tiles on your laptop running Windows Pro or Enterprise Edition.
If you are running Windows 10 Home please use the Windows 10 Home instructions
1. Enable Hyper-V in Windows
- Requires Windows 10 Pro or Enterprise
- Hyper-V provides hardware virtualization support in Windows
- Open a PowerShell terminal window as Administrator
-
To enable Hyper-V temporarily, enter the following command at the Power Shell prompt
Enable-WindowsOptionalFeature -Online -FeatureName Microsoft-Hyper-V –All - TIP: Step-by-step guide to enable Hyper-V permanently on your computer. This includes a discussion of how to enable Virtualization in BIOS.
2. Install Docker on Windows 10
- Requires Windows 10 Pro or Enterprise
- Download Docker Community Edition for Windows
- Double Click the Docker for Windows Installer.exe file
- Follow the instructions and accept default settings
- You may be asked to provide your password during installation
- You may be asked to restart your computer to complete the installation. If your computer restarts, you will need to reenable Hyper-V as explained in step 1 above.
- Start Docker for Windows from the Start Menu
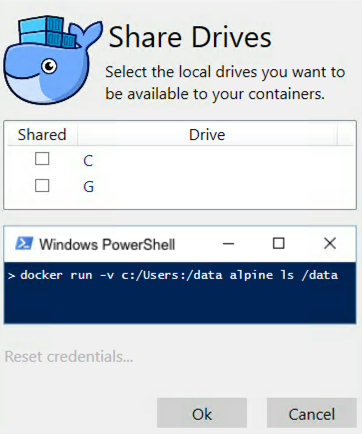
- Turn on Drive Sharing
- Open the settings for Docker
- Select the Share Drives option
 image source
 - Check the box next to “C”
- Click OK and you will be prompted for credentials with admin privileges
- If Docker was installed with an admin account different from your user account, you will need to check that your user is in the local docker-users group for your machine
3. Install a GDAL/OGR tools container
- Start a PowerShell Terminal with your normal user privileges. In other words do not start as admin as you did before.
- Go to Docker Hub
- Search for gdal
- Select klokantech/gdal
-
Copy the Docker Pull Command & run it at PowerShell prompt
docker pull klokantech/gdal
4. Convert Shape file into GeoJSON file
- Download zipped files of King County 2000 Census Block Groups
- Place zip file into your local user directory (eg: C:\Users\keump)
- “keump” will be replaced with your local user name
- Unzip zip file
- Use OGR tools at the PowerShell prompt
-
ogrinfo: check the shape file’s information
docker run -it --rm -v C:\Users\keump:/data klokantech/gdal ogrinfo KingCo_2000_Census_BlockGroups.shp -al -so -
ogr2ogr: convert shape file to GeoJSON file
docker run -it --rm -v C:\Users\keump:/data klokantech/gdal ogr2ogr -t_srs EPSG:4326 -f GeoJSON KingCo_2000_Census_BlockGroups.geojson KingCo_2000_Census_BlockGroups.shp -Progress
-
5. Locate a GeoJSON file
- You can download the following GeoJSON file for next step if needed
6. Install a Tippecanoe container which is a utility tool to create vector tiles
- Search for Tippecanoe on Docker Hub
- Select the jskeates/tippecanoe repository
- Copy the appropriate command from the Docker Pull Command section of the page
-
Paste it at the PowerShell prompt, and hit enter to run it
docker pull jskeates/tippecanoe
7. Create some vector tiles
- Ensure Docker is running on your computer
-
Start Tippecanoe container in interactive mode at the PowerShell prompt
docker run -it -v c:\users\keump:/home/tippecanoe jskeates/tippecanoe:latest - You will see your command prompt change to look like
bash-4.3$ -
Use the tippecanoe command at the PowerShell prompt to create vector tiles from the geoJSON file
tippecanoe -o KingCo_2000_Census_BlockGroups.mbtiles KingCo_2000_Census_BlockGroups.geojson -
Exit the container when it is done
exit - The vector tiles will be $HOME/KingCo_2000_Census_BlockGroups.mbtiles
- $HOME represents your user directory at a unix style command prompt.
8. Install a TileServer GL container
- Go to Docker Hub
- Search for tileserver-gl
- Select klokantech/tileserver-gl
-
Copy the Docker pull command & run it at the PowerShell prompt
docker pull klokantech/tileserver-gl
9. Run TileServer GL
- Ensure Docker is running on your computer
-
From the command line change into the directory where you have placed your mbtiles file.
-
Start the TileServer GL container from the PowerShell prompt
docker run --rm -it -v C:\users\keump:/data -p 8080:80 klokantech/tileserver-gl - Windows may prompt you to create a firewall exception, depending on your security settings. If asked, agree to the exception
-
Test that the vector tiles are being served by entering http://localhost:8080/ into your browser’s address bar
- After testing, hit ctl-C to quit TileServer GL